Admin Control Panel

New Post Change Layout Sign Out
Showing posts with label Penny Black. Show all posts

Friday, October 17, 2014

Pretty in Pink

Hi there!  This week the Tombow team has been sharing cards/projects with a pink theme in honor of Breast Cancer Awareness month and all of the Warrior women who have had  breast cancer.

I think if you ask anyone, they will say that they have either battled breast cancer or held the hand of someone who has.

The card I am sharing today is for all of them.  This card has a bit of a vintage feel, yet soft and powerful with pink tones.


The technique I used for this card is one that I call Glazed Watercolor Technique. It is simple, fun and quick!

I started this card by pulling out the Noble stamp from Penny Black and applying Tombow Dual Brush Pens directly to the rubber.  The colors I used are:

Leaves:  126 and 098
Flowers:  772, 723 and 761
Shading:  N95 

After coloring directly to the rubber, I gave the stamp a few spritz with some homemade shimmer spray (recipe below) and then I stamped it onto some 140# cold press watercolor paper and held it there for a count of 10.  Carefully lift the stamp and allow image to dry. 

 Now here comes the fun....glazing part...okay it isn't really glaze, but it looks that way when finished.  I inked the stamp with Versamark ink and overstamped the watercolor image (be sure your image is dry) a little to one side or the other as this gives a bit of a shadow. Emboss with clear embossing powder.   Use the Tombow N95 marker to add some light shading to the side of the image that is not covered by clear embossing.  See, I told you the technique was easy.  

I would love for you to give my technique a try, if you do please come back and leave me a message so that I can check it out and show you some love!

Now, here is the recipe for the homemade shimmer spray:

In a fine mist spray bottle add a little bit of Ranger Perfect Pearls in whatever color you prefer and then fill with water.  Give the bottle a shakey shake and you are ready to go.  If you like a little sparkle, just add a little powder.  If you like a lot of sparkle, add a little more.  I always start with a little and adjust as needed.

I used Tombow's Xtreme Adhesive and Foam Tabs to hold everything together.  This is a great combo when you are using heavier paper like watercolor paper.


Friday, July 11, 2014

Friendship Spring Branch


I hope your summer is treating you right and you have been staying cool and out of the heat.  No better way to do that then by heading to your stamping space and getting creative.

Today, I am sharing a card I creating using my Tombow Dual Brush Pens and a spritzer to give my card a watercolor effect.


I started by die cutting three of the Hero Arts Spring Branch dies out of 140# Cold Press Watercolor paper and then coloring one of them completely using the following Tombow Dual Brush Pens: Avocado #098, Pink Rose #703, Pink #723 and Chocolate #969 (always need a little chocolate somewhere when crafting ;)

On the 2nd die cut, I colored only the leaves and the flowers and on the 3rd, only the flowers.  Give each of the die cuts a little spritz with water and watch the magic happen.

The Tombow Dual Brush pens will blend together and give you a beautiful watercolor look.  
Before you layer and add your Spring Branch to the card, add a few splatters of color using the markers, a non porous surface (ie:  an acrylic block or plastic plate), a paintbrush or toothbrush and some water. I scribbled the marker onto an acrylic block, spritz with water and then pick up color with the brushes and holding the brush over the cardstock, tap it with your finger.  Do this with each of the colors.  You will really be glad that you did!   I got the larger splatters by using a large soft paintbrush and smaller splatters by using the toothbrush.

When your card base is good and dry, stamp a sentiment in a coordinating ink on the lower right corner.  The sentiment I used is from the Penny Black, Special Wishes #30-229 stamp set.  

Next, you will want to adhere your completely colored die cut onto the card using some Tombow Mono Multi.  Next, you will want to snip the leaves and flowers off of the second die cut and layer them to the first die cut using Tombow Mono Multi.  Be sure to offset the leaves and petals a bit for a more realistic look.  Now, you will add the final set of flowers from the third die cut in the same manner as before.  Add a few pearls for a finishing touch and you are good to go!

This card was really quick and easy to make and would be perfect for when you need to mass produce some cards.

Sending you wishes for a wonderful weekend, thanks for stopping by!

Wednesday, January 1, 2014

Top 13 of 2013

Hi there and happy 2014!


Operation Write Home is having a hop where each person can share their Top 13 cards/projects for 2013.

Now all of my projects may not be OWH cards and I will note underneath if there is a reason why it wouldn't meet OWH guidelines.  I think this will help the newer OWH card creators to know what can/cannot be used (i.e. glitter, bulk,) for our cards for our Heros. 

If you would like more info on any of the cards posted, please click on the name above the card to be taken to my original blog post.


OMIT the glitter from the heart on this one and it would be a great Valentine or Love card from OWH.  Always remember, no glitter for Operation Write Home.


I loved creating this card, possibly my personal favorite for the whole year.  I loved everything about making this card.


Okay, this is not okay for Operation Write Home but definitely on my favorites list.


This one has some layers, but lays nice and flat.  


This one was created for the Operation Write Home Memorial Day Blog Hop


I loved the way this one turned out, you can definitely tell it was warm outside by all of the bright colors I used :)


Okay, these are just plain fun!  OMIT the glitter from the guitar if you want to create something like this for OWH.  


Another bright and summery card.  If I were to use this for OWH, I would OMIT the glitter and just tie a small knot instead of the bow.


Lots of layers, but not a lot of bulk.  


This one was created for Operation Write Home's World Card Making Day Blog Hop.
Click the link above the card to see a more masculine version.


Lots of layers, but still nice and flat for OWH, OMIT the glitter on the cattails and this would be a great card for OWH.


Love the simplicity of this card, yet it has a little pop to it by using the silver embossing powder on the ornament.  

These were just some of my favorites for the year.  I invite you to stop back by and check out my blog as I love to create and share with you all.


Monday, November 18, 2013

Fall Themed hop with Tombow and Candace Pelfrey

Hi there!  Well Fall is definitely in the air here in Central CA, the temps have dipped into 40's and we have had to fire up the wood stove to keep our tootsies warm.

Today I am sharing a card I created with one of my favorite techniques that I call Watercolor Stamping.  Tombow Dual Brush Pens are perfect for this technique because they have a nice brush tip on one end making it very easy to color directly onto the stamp.


I think it is important to have a good quality paper for this technique and I like Arches 140# cold press watercolor paper.  I chose to use the Cattails #3214K from Penny Black and I colored the leaves/stems with Tombow Dual Brush Pens in #076 and #098  and the cattails in #947 and #993.  After you have brushed the colors onto your stamp, spritz the stamp with a fine mist of water.  Immediately stamp onto your watercolor paper, hold stamp in place for a count of ten as this will help the ink settle into the watercolor paper.  

I find when I use watercolor paper I like to use a strong adhesive like Tombow Power Bond to adhere the paper to the next layer.  For each of the subsequent layers I used Tombow Mono Adhesive Dots as it is perfect for layering paper to paper.
I finished off the card with some Diamond Stickles on the cattails and some green ribbon ties.

Now, for the fun part.  Tombow has a great giveaway this week.  You could win the following:


In order to enter to win the prize, please comment on all the Design Team’s projects this week and if you are on Facebook, please pop on over and “Like” TombowUSA and  Jaded Blossom.   We will announce the Winner Friday November 22nd at 3:30 EST!


If you would like to see more of my creations, I would love it if you "like" my INKclinations Facebook page...you would make this girl really happy if you did :)

Friday, April 5, 2013

Have a beautiful day...

Hi there!  Today I am sharing a card that I created using a fun technique that creates a pretty watercolor effect.

A few weeks ago, I shared this card on the Tombow blog and one of our followers named Ann suggested that I create the background with Tombow Dual Brush pens instead of the inks that I had previously used.  So I did just that!


I started by embossing the Penny Black Damask Pattern stamp with black embossing powder and then I scribbled ink in #676 Royal Purple, #679 Dark Plum and #725 Rhodamine Red onto a craft mat and spritz with water.  The picture below is the markers before the water was added.  After spraying the scribbles with water, I smooshed the embossed image around to pick up the pretty colors.  I used Tombow Stamp Runner, Foam Tabs and Power Tabs and Mono Multi to adhere the parts of the card together.


Give this simple, fun technique a try, you will love it!

Friday, March 8, 2013

Watercolor Beauty


Happy, happy Friday!  

It has been awhile since I have watercolored with my Tombow markers and I knew the moment I saw this stamp from Penny Black, that it would be perfect to watercolor.


I stamped the Penny Black Trailing Beauty stamp in black Archival ink and used  a waterbrush and Tombow Dual Brush pens in the following colors to make this card come to life!


I started by coloring the stems and most of the leaves with the Pale Yellow marker and blending it out with a Niji Waterbrush. I was careful to let each layer of color dry before adding the next color.   Next, I added the medium green tone and blended and continued the color, blend, dry process for each of the sections. I used the Sky Blue marker around each of the flower/leaf sections as highlight being careful not to over saturate the paper with water and blend the blue into the other colors.  I added some Diamond Stickles to the centers of each of the flowers as a finishing touch.

I used Tombow Mono Adhesive Dots to adhere each of the flat layers together and Tombow Foam Tabs to mount the image panel onto the base card.  I wanted a little less lift for the sentiment panel so I used Tombow Power Tabs as they are a tad thinner than the foam tabs.


Here is a close up of the flowers in all of their glittery goodness!


Tuesday, November 6, 2012

{warm thoughts}

Hi Y'all! 

 It's BLD Tuesday and this month we are going to be showcasing some of the wonderful fall and holiday/winter images that are in the By LORi Designs Digi Shop.

The card I am sharing with you today used the adorable Puddle Jumper Katie and Grace image, go here and scroll down toward the bottom of the page.  Watch out, you will find a ton of other cute images that you will have to have...just sayin' ;)


Recipe:
Image(s):  Puddle Jumper Katie and Grace-By LORi Designs, Warm Thoughts-Paper Smooches
Cardstock:  PL Pumpkin Pie, PL Green Apple-Gina K. Designs, Madison Prints-Penny Black, Neenah Classic Crest Solar White-The Cat's Meow
Ink(s):  Memento Tuxedo Black, Memento Dandelion, Adirondack Caramel
Coloring Medium:  Copic Markers
Adhesives:  Tombow Dots Adhesive Roller, Tombow Foam Tabs, Tombow Mono Aqua
Extras:  Button, Ribbon, Flowers, Spellbinders Dies

Be sure to head on over to By LORi Designs and check out what the rest of the team has come up with to inspire you.

Thursday, June 14, 2012

No Lion, It's Your Birthday

Woo hoo, the weekend is almost here!  I can't believe we are almost half way through the year, before you know it the holiday season will be upon us. Egads!  

This week on the Outlawz Twisted Thursday challenge we are creating cards with an animal theme.  


I started by stamping this sweet little lion from Penny Black in Tuxedo Black Memento ink and coloring him in with Copic markers. I added glitter to his beautiful mane with a glue pen and some Warm Highlights Glitter Ritz glitter.  After the glue had dried under the glitter I added a bit more color with a Copic marker.  Don't worry, this glitter is so microfine, that it won't be a problem for your marker nib.  I had saved the Mojo Monday 230 sketch from a few months ago and finally got a chance to play with it.  I ended up turning the sketch on it's side as I thought it would look good to have the scallop edge on the side instead of the bottom.  I didn't have a sentiment that I thought was just right, so I generated this one on the computer using my new favorite font LD Woodland, I think it is perfect for this image.  The solid cardstocks are from American Crafts and this fun print is from an older Bo Bunny collection.  I wanted this card to be fairly flat so all layers were adhered with Tombow Mono Dots Roller, this has to be my favorite all time adhesive when you are needing to layer paper to paper without all of the fussy pop up layers.  

My Twisted Thursday teamies and I would love to have you play along with us this week.  You can find all of the details HERE.

Friday, May 18, 2012

Watercolor Butterfly

Hello!  Wow, that is all I can say about the beautiful weather we have been having here in Cental CA.  I just want to be outside all of the time!  

A couple of weeks ago, I attended The Great Yosemite Stamp Escape and one of the things that we do every year is to trade ATC's.  ATCs (Artist Trading Cards) are 2 1/2" x 3 1/2" little pieces of artwork.  I normally make between 80-100 each year.  This year I chose to do a simple ATC.  I decided to use one of my all time favorite Penny Black stamps and Tombow Dual Brush pens to create these little works of art.

I chose three Tombow Dual Brush pens (Pink #723, Rhodamine Red #725 and Purple #665) and colored directly onto the stamp and spritzed lightly with some homemade pearl shimmer spray and stamped onto some Neenah Solar White 80# cardstock.  After you apply the stamp to the paper, count to three as this allows the ink to soak into the paper a bit and your image will have a bit more definition.  


Once the butterflies were all dry, I stamped the sentiment from the Hero Arts Clear Design Friends set in Memento Tuxedo Black ink onto the lower left corner.  I then rounded the upper right corner of my image panel and my Orchid/Black layering panels with the We R Memory Keepers Corner Chomper.  Love that tool!


Next, I used some Tombow Mono Dots Roller to mat the image panel to some Orchid and Black American Crafts panels.  The black panel is 2 1/2" x 3 1/2", the orchid is 2 3/8" x 3 3/8" and the white panel is 2 1/4" x 3 1/4".  


Here is what they looked like once they were all assembled.  The Dual Brush Pens react so nicely with the shimmer spray and the butterflies just glisten!

Thursday, April 19, 2012

Wedding Wishes

Hi there!  I am trying to get back into the groove after my amazing trip to NYC.  I had a wonderful time bopping around the city with my niece.  The big highlight for me was going to see The Lion King.  I have always wanted to see that show and there was something magical about seeing it in New York.  I decided not to take my camera and to use the camera on my phone instead......wrong thing to do.  Something happened and most of my pictures are gone.  I have a few I took in Times Square and a few from Yankee Stadium.  I am so bummed about this.  Next time I go somewhere, I will take my camera for sure.  

The card I am sharing with you today is for the Outlaws Challenge Group's Thursday Twist challenge.  This week, we were challenged to make a wedding themed card.  Egads, I did not know what I was going to do.  I decided to use this elegant couple image from Penny Black.  I decided to go with a CAS style as the image is so elegant.


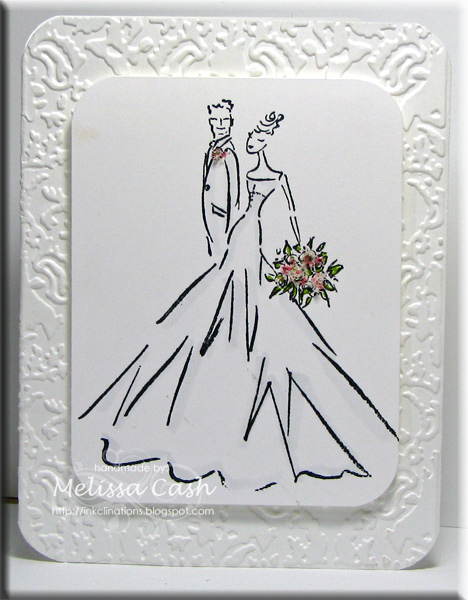
I started with a white card base and ran it through the Cuttlebug with one of my Tim Holtz embossing folders and rounded the corners.  The Penny Black image was stamped in black ink onto some white cardstock and the corners were rounded to match the card base.  I added a wee bit of C1 Copic marker to the dress and tux and Tombow marker #192 for the leaves of the flowers.  I dotted the flowers with Tombow Mono Multi and sprinkled with Flower Soft.  I really like how clean and elegant this card turned out.  

We would love to have you join us at the Outlaws Thursday Twist challenge, each week there are prizes to win.  So get busy and create a wedding themed card and head over to the group and share it with us.  

Wednesday, August 24, 2011

Scraptastic Butterfly

Happy Wednesday!

Whew, it is finally heating up here in Central CA!  We will be in the low 100's all week.  We have been pretty lucky so far this year as we usually reach the higher temps much earlier in the summer season.  Lucky for me, I have lots of fans in my house because when I got in from work last night, the air had been running all day............but the house was hotter than heck.  Yep, the central air seems to be on the fritz and I am waiting for the repairman to show up at anytime.  I am keeping my fingers crossed that it is just the thermostat and it will be an easy fix.  In the meantime, I decided to do a little stamping.
I love the CR84FN color challenges and especially like that they are running two weeks long right now.  I would love it if they stayed that way, as it gives me a bit more time to get the challenge done before the next one comes along.  The current challenge (CR84FN36) is to use the following colors:
At first, I thought these colors were going to be a bit tricky for me to work with as I don't use alot of yellow (especially as a main focus) as a general rule.  I really like this weeks Sweet Sunday Sketch 131 so I decided to pair the two up and this is what I came up with.  This card measures 4 3/4" square.  I inked up the adorable Cocoa Bean Butterfly from Memory Box in Scattered Straw Distress ink and stamped it onto a piece of cream cardstock several times and then again onto a scrap which I cut out and layered up with some foam tape.  The Penny Black sentiment (one of my favs) is inked up in Memento Rich Cocoa and stamped over the butterflies.  The kraft base card was embossed with a leafy embossing folder and then edged with a bit of Tea Dye Distress ink.  All of the cardstock used was from my scrap pile. :)


stamping hugs,

Friday, June 17, 2011

Butterfly Notes

Hi there! I am so thrilled to have been asked to Guest Design for Tombow today. The project I am sharing with you is a set of simple, easy to mail notecards that I have made for my Mom. Mom loves butterflies, so I picked several butterfly images from my stamp stash to work with.


Each of the cards started with a standard A2 (4 1/4" x 5 1/2") white card and stamped the top half with the butterfly images. For the purple "thinking of you" and the Aqua "happy birthday" cards I colored the Penny Black butterfly stamp directly with my Tombow Dual Brush markers and then spritzed the stamp with water before stamping the image. I love the soft watercolor effect this creates. I added a 3" x 4 1/4" piece of print cardstock and a piece of ribbon to each one using Tombow Mono Tape Runner. To finish off each card, I added a piece of knotted ribbon that I attached with Mono Aqua Adhesive.



I can't thank Sharron and the Crew at Tombow enough for inviting me to share my love of stamping (and Tombow) with you.  Keep your fingers crossed that they will let me do it again!  :)

see you soon,

Related Posts Plugin for WordPress, Blogger...

Current Design Teams

Crafters Companion

Repeat Impressions

Repeat Impressions
 

Past Design Teams

Tombow

Tombow

Tombow

Tombow

Tombow

Tombow

By Lori Designs

By Lori Designs

Gina K Designs Center Stage Alumni Team

Gina K Designs Center Stage Alumni Team

Our Craft Lounge

Our Craft Lounge

Outlawz

Outlawz
Outlawz
 

Guest Designer

Melanie Muenchinger Spring Basket Set February 2011

Melanie Muenchinger Spring Basket Set February 2011

Tami Mayberry Hopeful Hearts Set January 2011

Tami Mayberry Hopeful Hearts Set January 2011

May & October 2009 Gina K Designs Center Stage Designer

May & October 2009 Gina K Designs Center Stage Designer
 

Featured

Fetti Fave

Fetti Fave
May 2013

Fetti Find

Fetti Find
May 2013

TPE Winner

TPE Winner
10/3/2012

by LORi designs Winner

CR84FN


This blog has been Tweaked and Designed by Sara Williams | Powered by Blogger | Back to top
 
Pin It button on image hover