Admin Control Panel

New Post Change Layout Sign Out
Showing posts with label Reverse Confetti. Show all posts

Wednesday, December 3, 2014

Paper Crafts & Scrapbooking Magazine Farewell Blog Hop

This is my second post today, please scroll down to find my Repeat Impressions post


It is time to say goodbye to the end of another era....the era of Paper Crafts and Scrapbooking Magazine.

You should have arrived at my blog from Chunyuan Wu's blog, but if you didn't you can  click the Inlinks link below to start from the beginning.

I am not going to go on and on as we all know that Paper Crafts has done so much for the rubberstamping/papercrafting community, industry and its designers. 

You will be missed by many.

To say THANK YOU I have created a few cards from quick and easy to lots of layers to share my GRATITUDE for the fine folks at Paper Crafts and Scrapbooking Magazine.

Now, on with the show:
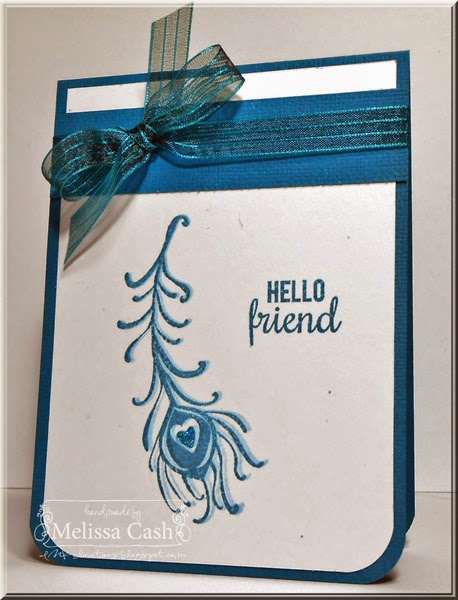

Products used:
Stamps:  Reverse Confetti
Ink:  Memento Teal Zeal
Cardstock:  Bazzill, Neenah
Extras:  Ribbon, Glitter Glue


Products used:
Images:  Silhouette Cut Files
Cardstocks:  Neenah, Bazzill
Extras:  Crafter's Companion Chevron Embossalicious 6 x 6 Folder, Cuttlebug Dots Embossing Folder, Glitter Glue, Glossy Accents


Products used:
Stamps:  Crafter's Companion Barkley Everyday--Special Friend
Cardstocks:  Bazzill, Spectrum Noir Premium White Cardstock, Stash
Coloring:  Spectrum Noir Markers: BG1, BG2, BG3, BG4, CR8, DG2, EB3,GB1, IB1, PP1, TB2, TB4, TN7
Extras:  Twine, Flowers, Wink of Stella, Glossy Accents


I hope you have enjoyed my creations, now I am going to send you on to Annette Allen's blog.


Monday, September 15, 2014

Tombow Challenge Time--Jennie's Book Challenge

Hey there and happy Monday.  It is time for Jennie to share her challenge on the Tombow blog and Jennie has chosen a "Book" Theme.  

For my project, I chose to make some Fall themed bookmarks.


I used one of my favorite Fall themed stamp sets from Reverse Confetti called Forever Fall.  I love to color my stamps with Tombow's Dual Brush pens and wanted to give it a try with this set.  I wasn't sure how well it would work because the stamps are clear and sometimes that can be a bit tricky.  I loved how these turned out.  I colored the images with the markers and then gave them a light spritz with water and stamped them onto some cream cardstock.  I wanted to keep these very simple as I am going to make quite a few and donate them to our local library to give to the kids when they check out books.  

A little tip I gave a few days ago and want to repeat because I used it again today.

Use some Tombow Mono Aqua on your twine to stiffen it up a bit as this allows it to be much easier to tie in a bow.  The bow will really hold it's shape this way.  To do this, I just squirt some Mono Aqua out onto a scrap of cardstock and run the twine through it,  I use my fingers to lay the twine out nice and straight on my non stick craft mat and let it dry for a few minutes before I tie a bow or add to a project.

Now, how would you like to win this awesome prize pack?

                                                   MONO Multi Liquid Glue

Head on over to the Tombow blog for all of the details!

Monday, July 14, 2014

You Are My Sunshine

Hey there and happy, happy Monday to you!

Today, my friend Debbie Fisher has issued up a challenge on the Tombow blog.  Debbie has challenged us to create a card/project with a sunshine theme.

Well, the sun sure has been shining here and it made for some awesome inspiration for my card.


This card is a fun size at 3" x 6".  I started this one by heading to my Silhouette library and looking for a sun and sentiment.  I found this fun sun and cut it out in orange and yellow cardstocks.  I layered the orange to the yellow using Tombow Mono Multi and then popped it up using Tombow Foam Tabs and then adhered to the top left corner of my card with another foam tab.  The cloud and orange cardstocks were added to a yellow card base using Tombow Xtreme Adhesive.  

Next, I stamped the "You" and "are my" in black ink using the Reverse Confetti All About You set and then cut three of the "sunshine" with my Silhouette and stacked them using Tombow Mono Multi and added it to my card with a little more Mono Multi.  

For the finishing touch I used Tombow Mono Aqua on the sun and the sentiment and then covered them with Warm Diamond Silk Microfine Glitter.  

Would you like to win this awesome prize pack?


 Be sure to head on over to the Tombow blog and check out the details of her challenge.  We would love it if you would play along.

Tuesday, January 14, 2014

Burlap and Bling

Whew! I am having a busy week, how about you.  I am writing this from my hotel room in Anaheim, CA  where I am attending the CHA Show.  

This year, Tombow asked the design team to create projects using Burlap and Bling.  One of the projects I made for the booth is this fun Valentine's Day card using burlap.

 I freehand cut a heart from some natural burlap and then layered two die cut hearts on top.  I used Tombow Mono Multi to adhere each of the paper layers together and then again to hold the paper layers to the burlap.  I really wanted to make sure the burlap would stay affixed to the card so I used Tombow Power Tabs between the card base and the burlap.  This worked so well as the Power Tabs have a very strong bond.  I used stamps from Reverse Confetti for the sentiment.


This card was another that I created using some bling.  I adhered each of the layers together with Tombow Mono Adhesive Dots and popped up the sentiment with Tombow Foam Tabs.  I used stamps from Reverse Confetti for the sentiment.


Wednesday, January 1, 2014

Top 13 of 2013

Hi there and happy 2014!


Operation Write Home is having a hop where each person can share their Top 13 cards/projects for 2013.

Now all of my projects may not be OWH cards and I will note underneath if there is a reason why it wouldn't meet OWH guidelines.  I think this will help the newer OWH card creators to know what can/cannot be used (i.e. glitter, bulk,) for our cards for our Heros. 

If you would like more info on any of the cards posted, please click on the name above the card to be taken to my original blog post.


OMIT the glitter from the heart on this one and it would be a great Valentine or Love card from OWH.  Always remember, no glitter for Operation Write Home.


I loved creating this card, possibly my personal favorite for the whole year.  I loved everything about making this card.


Okay, this is not okay for Operation Write Home but definitely on my favorites list.


This one has some layers, but lays nice and flat.  


This one was created for the Operation Write Home Memorial Day Blog Hop


I loved the way this one turned out, you can definitely tell it was warm outside by all of the bright colors I used :)


Okay, these are just plain fun!  OMIT the glitter from the guitar if you want to create something like this for OWH.  


Another bright and summery card.  If I were to use this for OWH, I would OMIT the glitter and just tie a small knot instead of the bow.


Lots of layers, but not a lot of bulk.  


This one was created for Operation Write Home's World Card Making Day Blog Hop.
Click the link above the card to see a more masculine version.


Lots of layers, but still nice and flat for OWH, OMIT the glitter on the cattails and this would be a great card for OWH.


Love the simplicity of this card, yet it has a little pop to it by using the silver embossing powder on the ornament.  

These were just some of my favorites for the year.  I invite you to stop back by and check out my blog as I love to create and share with you all.


Thursday, November 21, 2013

Always and Forever

Have you seen the awesome November Color Challenge going on at the Reverse Confetti blog?  

Jen put out the challenge to use Gray, Orange and Navy.  You can check out the challenge here


After fussing and fiddling, this is what I came up with.  I am still over the moon about this woodgrain heart from the RC Forever Fall set and knew I would be incorporating it into my design.  I went to Pinterest for some inspiration and ended up taking ideas from several cards and putting them all together. 

I started with a navy card base and then added a distressed edged orange panel kind of caddy wompus.  Next I stamped the large dots from the RC Whole Lotta Dots set with silver ink onto a distress edged white panel and added a tag cut from the RC Tag Me Die  and adhered it to the card with some orange/white bakers twine.  I stamped the heart in navy ink and popped it up onto the tag.  Next I cut the banner shape from the RC Tag Me set and stamped the sentiment from the RC Lots To Say set in navy ink and popped it up onto the dotted panel.  I added a little bit of Diamond Stickles to the heart and called it done.  

Have a wonderful weekend!

Monday, November 11, 2013

Happy Fall SFYTT

This is my second post today, please scroll down for my Tombow post.

I'm back again today to share a Fall card that I created for Reverse Confetti's Nov SFYTT.


I started with a cream card base and stamped the woodgrain image from the RC Forever Fall in Parchment Colorbox ink all over.  I layered up some print papers (from my stash) following the sketch guidlines.  I stamped the sentiment from the set onto the cream piece and then embossed the bottom portion with a Sizzix embossing folder.  Next I stamped and fussy cut the cute little acorn from the set and added it with some die cut leaves to the card.  

Here is the sketch:
There is still a few days left to link up your card on the Reverse Confetti blog, you can check out the details here.

I am sending wishes to all for a beautiful day!


Monday, October 28, 2013

Batty For You

Hello and happy Monday to each and everyone!  I really appreciate that you spend a moment of your day with me.  

Today the Tombow Design Team is hopping with Kim Watson, you should have arrived at my blog from Debbie's blog, but if you didn't you can go back to Tombow's blog and start at the beginning.

  I don't do many Halloween cards as we live in a rural area and we don't get trick or treaters unless you count the occasional wildlife that cruise through,  so I took two of my new sets to create a sweet note for my hubby that has a bit of Halloween flair to it.


My inspirations for this card was sketch #225 from Unscripted Sketches (see below) and the Reverse Confetti Spooky Sentiments and Forever Fall stamp sets.

I started with a white base card and added a panel of black and a white embossed panel.  I popped the panels up with Tombow Foam Tabs.  Next, I cut three strips of print paper from my stash to create little banner flags.  I attached these to the embossed panel using Tombow Mono Adhesive Dots .  The sentiment and heart were stamped with black ink.  I cut the heart out and popped it up onto a couple more Tombow Foam Tabs.  The bat was cut from a Silhouette cut file and attached to the heart with a small piece of a Tombow Power Tab.  For a finishing touch I added 3 flat green nailheads between two of the strips and added Tombow Mono Aqua to the bat and then sprinkled black ultrafine glitter from Art Institute to make him sparkle.


Here is a close up of the sparkly bat.  He doesn't look too spooky to me!


Here is the great sketch I used. 

Please be sure to visit each of the blogs along the hop and leave a comment, you could have a chance to win this prize pack:


Here is a complete list of blogs:

Don't forget to comment because we love sharing Tombow products with our friends!


Friday, October 4, 2013

Live, Laugh, Love


Hi there and happy, happy Friday to each and every one of you!  

I hope all is well in your world, the weather has been beautiful here and I am looking forward to the weekend!

Today, I am sharing a card I created using the October Reverse Confetti Sketch For You To Try


As soon as I saw the sketch I knew what I was going to do.  Everything except for the black card base was scraps that were left from previous stamping sessions.  I started by pulling out the Reverse Confetti Peacock Pretties set and stamping the feather image several times onto the light green cardstock.  Next, I spritzed the stamped panel with Edelweiss Moss Green Starburst Spray from Lindy's Stamp Gang.  You can't tell, but there is the prettiest shimmer to this card.  Because the spritz warped the cardstock a bit, I used Tombow Power Bond Adhesive to adhere the panel to the black card.  I embossed a purple panel and adhered it to a black panel using Tombow Power Bond as it is great to use when you are working with items with texture. I stamped the icons and sentiment with black ink onto some of the light green cardstock and cut it out with a circle punch and layered to a black and then purple circle using Tombow Mono Multi and then they were popped up using Tombow Foam Tabs.  Some Doodlebug pearls were added as a finishing touch.


Thanks for stopping by today, be sure to stop by tomorrow for the OWH WCMD Blog Hop.

Monday, September 23, 2013

Shore Do Love You

 Thank you all for stopping by today, it makes my heart happy :)

Today, the Tombow team is blog hopping with Ema Perez.  You should have arrived at my blog from Debbie's blog, but if you didn't you can go back to Tombow's blog and start from the beginning.

Ema has a great project that she is working on to benefit the children of St. Judes Childrens Hospital.  Ema's project is to create/gather 300 cards for the children.  You can leave your e-mail address in the comments if you would be interested in helping Ema reach her goal.

Here is one of the cards I will be sending to Ema.


I created this card using another favorite Reverse Confetti stamp set called Happy Harbor.  I used papers from the Fancy Pants Wonderful Day collection.  I started with a white cardbase and added three flags cut at different lengths.  I used Tombow Power Bond to adhere the corrugated piece to the card and Tombow Mono Adhesive Dots for the remainder of the flat layers.  I stamped the sentiment, flags and lighthouse onto a white circle panel and adhered it to the yellow and gray circles using a bit more Tombow Mono Adhesive Dots.  I popped up a second lighthouse and the gray panel with Tombow Foam Tabs.  The lighthouse was colored using Tombow Dual Brush Pens.

Now, we couldn't have a hop with out a giveaway...now could we?  Be sure to leave me a comment for a chance to win.  


We will be giving away two sets of both of the Tombow Stamp Runners.


Now, I am going to send you on your way to Jennie's blog, but be sure to stop by each of the blogs and comment for a chance to win.

Here is this week’s Line-up:
Tombow Blog
Debbie
Melissa
Jennie
Marie
Ema Perez
Tombow Blog

Thank's for visiting today!


Monday, September 16, 2013

Hop with Tombow and Stacy Julian

Hi there, the Tombow team is hopping again this week.  This week we are hopping with Stacy Julian.

You should have arrived at my blog from Debbie's blog, if you didn't you can head on back to Tombow's blog and start at the beginning.


I have created a card using some of the amazing Fancy Pants Panorama paper from the Memories Captured collection and the Reverse Confetti Inner Rock Star stamp set. I used Tombow Mono Adhesive Dots to adhere each of the flat layers together.  I used Tombow Foam Tabs to pop up the sentiment panel.  For the stars, I applied some Tombow Mono Aqua adhesive and then sprinkled some glitter to make them come to life!  My layout was inspired by sketch DS116 from The Deconstructed Sketch.


Want to win this fabulous prize pack?

NEW Blending Kit


Dual Brush Pen Set, 6 Retro


NEW Irojiten Color Dictionary Pencils, Rainforest Volume 2 Vivid Tone 1 (10 Colored Pencils)


Be sure to: “Like” BOTH TombowUSA and  Stacy Julian on Facebook! 
Then leave a  comment that you did.
 The WINNER will be announced on FRIDAY September 20th at 3:30 EST.

I am going to send you on your way to Jennie's blog, but be sure to visit and comment on each blog along the way.

Melissa:
Jennie:
Marie:
Stacy Julian:http://stacyjulian.com/ 


Related Posts Plugin for WordPress, Blogger...

Current Design Teams

Crafters Companion

Repeat Impressions

Repeat Impressions
 

Past Design Teams

Tombow

Tombow

Tombow

Tombow

Tombow

Tombow

By Lori Designs

By Lori Designs

Gina K Designs Center Stage Alumni Team

Gina K Designs Center Stage Alumni Team

Our Craft Lounge

Our Craft Lounge

Outlawz

Outlawz
Outlawz
 

Guest Designer

Melanie Muenchinger Spring Basket Set February 2011

Melanie Muenchinger Spring Basket Set February 2011

Tami Mayberry Hopeful Hearts Set January 2011

Tami Mayberry Hopeful Hearts Set January 2011

May & October 2009 Gina K Designs Center Stage Designer

May & October 2009 Gina K Designs Center Stage Designer
 

Featured

Fetti Fave

Fetti Fave
May 2013

Fetti Find

Fetti Find
May 2013

TPE Winner

TPE Winner
10/3/2012

by LORi designs Winner

CR84FN


This blog has been Tweaked and Designed by Sara Williams | Powered by Blogger | Back to top
 
Pin It button on image hover